
Introduction to Mongoose.js
The Mongoose.js Object Data Mapper (ODM) for MongoDB makes it much easier for Node.js applications to communicate with the database. It serves as an add-on to the main MongoDB driver, offering a more organised and object-oriented method of handling your data.
Because MongoDB is document-oriented and fits very well with JavaScript’s JSON syntax, it is a popular NoSQL database option for Node.js applications that frequently need persistent storage for their data. MongoDB has an official driver, however for everyday tasks, its API might be low-level and occasionally difficult to use. Herein lies the role of Mongoose.js.
Mongoose.js facilitates the management of application data by offering a higher-level abstraction. Its main advantages are:
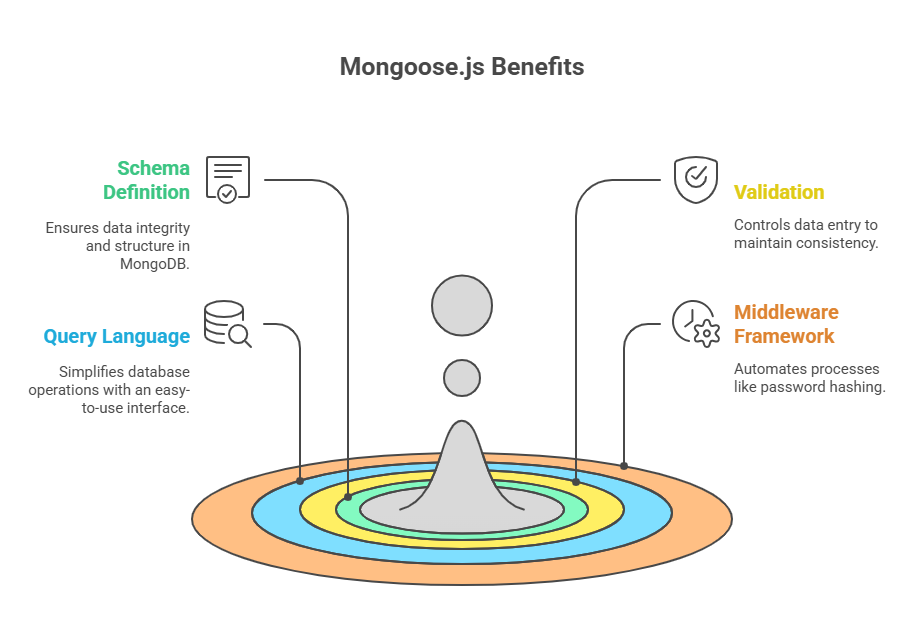
- Schema Definition: Despite the fact that MongoDB is schemaless, Mongoose lets you create a schema for your collections. In addition to guaranteeing data integrity, this gives your documents structure and uniformity.
- Validation: It has strong data validation features that let you control what information may be entered into the database, such requiring specific fields or guaranteeing unique values.
- Query Language: Unlike the native driver, Mongoose offers an easy-to-use query language that streamlines database operations such as locating, editing, and removing documents. This makes the code frequently more understandable and succinct.
- Middleware Framework: With Mongoose’s support for middleware, you can automate processes like password hashing by executing code either before or after specific lifecycle events (such saving a document or deleting a user).
Installation
It’s easy to set up Mongoose.js in your Node.js project with the Node Package Manager (npm). First, make sure your machine has both npm and Node.js installed. Next, use your terminal or command prompt to go to the root directory of your project and execute the following command: npm install mongoose.
The Mongoose package and its dependencies will be downloaded by this command and installed in the node_modules folder in your current directory. It is also advised to use the --save flag, which can be shortened to npm i -S mongoose, to automatically install Mongoose as a dependency in your package.json file. This will help you keep track of and manage project dependencies.
Schemas and Models in Mongoose.js
After installation, schemas and models are at the centre of Mongoose.
Schemas
The documents in a MongoDB collection are organised according to a Mongoose schema. It lists the field names, data types, and any default values or validation rules that apply.
You define a schema by creating a new mongoose.Schema object. To specify a User schema that holds a user’s name, email address, password, gender, and date of birth, for instance, you may write:
const mongoose = require('mongoose');
const Schema = mongoose.Schema;

var UserSchema = new Schema({
    name: {
        type: String,
        required: true, // Example of validation: 'name' is a required field
        trim: true // Example of sanitisation: removes whitespace from both ends of the string
    },
    email: {
        type: String,
        required: true,
        unique: true, // Example of validation: 'email' must be unique
        trim: true,
        lowercase: true, // Converts string to lowercase before saving
        validate(value) { // Custom validation using a validator library
            if (!validator.isEmail(value)) {
                throw new Error('Email is invalid');
            }
        }
    },
    password: {
        type: String,
        required: true
    },
    dob: {
        type: Date
    },
    gender: {
        type: String // Male/Female
    },
    created: {
        type: Date,
        default: Date.now // Sets a default value if not provided
    }
});
Moreover, by default, Mongoose appends an ObjectId (_id) column to every schema. A user with numerous tasks is an example of a link between models that can be defined by adding virtual properties, which are not kept in the database.
Models
After a schema is established, a Mongoose Model is made using it. A model is a constructor function that offers an interface for working with the database. It enables you to create, read, update, and delete (CRUD) documents according to the specified schema.
In order to construct a model, you call mongoose.model() and feed it the schema you created as well as the model’s name, which usually matches your collection name in lowercase and plural form:
const User = mongoose.model('User', UserSchema);
module.exports = User; // Export the model for use in other files
Interacting with Data using Mongoose Models (CRUD Operations)
Performing database operations is considerably easier if a model has been established:
- Creating/Saving Documents: You must first instantiate the model and then invoke its
save()method in order to generate a new document. The new document is saved to the database as a result. - Reading/Finding Documents: Models offer database querying functions such as
find(),findOne(), andfindById(). - Updating Documents: You can change existing documents by using methods like
updateOne(),updateMany(), andreplaceOne(). - Deleting Documents: The
deleteOne(),deleteMany(), and the more traditionalremove()methods can all be used to remove documents.
Connecting to MongoDB
MongoDB connection using Mongoose
Usually, you use the mongoose.connect() function to connect to your MongoDB database from a Node.js application using Mongoose.
In general, it operates as follows:
- Import Mongoose: To begin, require the Mongoose module (typically using
const mongoose = require('mongoose');). - Connection URL: The
mongoose.connect()function takes a connection URL as its first argument. This URL specifies the database server (e.g.,localhost), the port (defaulting to27017), and the database name (e.g.,myNewDB,dbName,task-manager-api, orstackoverflow-example). If the specified database doesn’t exist, MongoDB will often create it automatically upon the first data insertion.- For example, a common connection string format is
mongodb://localhost:27017/dbName. You can also connect with custom credentials likemongodb://USER:PASSWORD@HOST:PORT/DATABASE.
- For example, a common connection string format is
- Options: The
mongoose.connect()function can also accept an options object as a second argument to configure the connection.- For instance,
useNewUrlParser: trueanduseCreateIndex: trueare often recommended options for newer Mongoose versions. - Additional connection pooling parameters, including
poolSize, which specifies how many connections to open, are also available.
- For instance,
- Connection Handling: The
mongoose.connectionobject has event listeners that you can use to verify a successful connection or detect errors:db.on('error', console.error.bind(console, 'connection error:'))handles connection errors.db.once('open', function() { /* we're connected! */ })fires once the connection is successfully established.
After being connected, Mongoose models may be created and used to communicate with the database, enabling a more organised method of managing data.
const mongoose = require('mongoose');

mongoose.connect('mongodb://localhost:27017/myDatabaseName', {
    useNewUrlParser: true, // Recommended option for new connections
    useCreateIndex: true // Recommended option for creating indexes
})
.then(() => console.log('Connected to MongoDB successfully!'))
.catch(err => console.error('Could not connect to the database:', err)); // Error handling for connection

// Listen for connection errors after initial connect
const db = mongoose.connection;
db.on('error', console.error.bind(console, 'connection error:'));
db.once('open', function() {
    console.log('We are connected!');
});
Mongoose.js simplifies development and improves data management for Node.js developers collaborating with MongoDB thanks to its all-inclusive approach.
Create Operations (Inserting Documents)
Everything that has to do with your data in Mongoose comes from a schema. The structure and kinds of characteristics for your documents in a collection are specified by a schema. A UserSchema might, for instance, define age as a number and name as a string. You can also enforce data validation and sanitization at the schema level, such as making fields required, trimming whitespace, converting to lowercase, or even adding custom validation rules (e.g., for email addresses) using libraries like validator.
A Mongoose model is created from a given schema and acts as a constructor function for new document creation.
To insert a new document (create an operation):
- Create a New Instance: Use your Mongoose model to create a new document. An example would be
const user = new User({ name: 'Andrew', age: 27 });. - Save to Database: Give the freshly generated instance a call to the
save()method. Using this technique, the object is persistent in the MongoDB database.- In most cases, the
save()function takes an optional callback to handle failures or the successful outcome. - If an object is stored without a
_idattribute, Mongoose will assign a uniqueObjectId. - The POST HTTP method (e.g.,
POST /usersorPOST /tasks) is used for REST API resource creation endpoints. In Express, a route would be defined asapp.post('/users',…). Before usinguser.save(), incoming JSON data in the request body can be parsed usingexpress.json()and then supplied to the model constructor (for example,const user = new User(req.body)).
- In most cases, the