
Create a JavaFX
JavaFX, the next-generation Java GUI framework, facilitates the creation of visually beautiful and interactive user interfaces with power, efficiency, and flexibility. In order to replace Swing in new GUI-based projects, it was built to meet modern GUI design standards. Java programmer must comprehend JavaFX, the platform of the future, while Swing will continue to be utilised for legacy applications.
JavaFX Script, a scripting language, was discontinued. JavaFX 2.0 has a complete API because it is programmed directly in Java. JDK 7, update 4, and JDK 8 include JavaFX 8. Its extensive Java ecosystem integration is indicated by the version number matching the JDK version.
JavaFX outperforms ADT and Swing. After “heavyweight” AWT components relied on platform-specific peers, operating systems looked and felt different. Later, Java code-rendered swing components were “lightweight” and pluggable, but they occasionally struggled to create the “visual sparkle” needed by current applications. The lightweight JavaFX simplifies GUI creation with rich geometry, transformations, and effects.
Key Concepts in JavaFX
A set of key ideas defines JavaFX’s architecture:
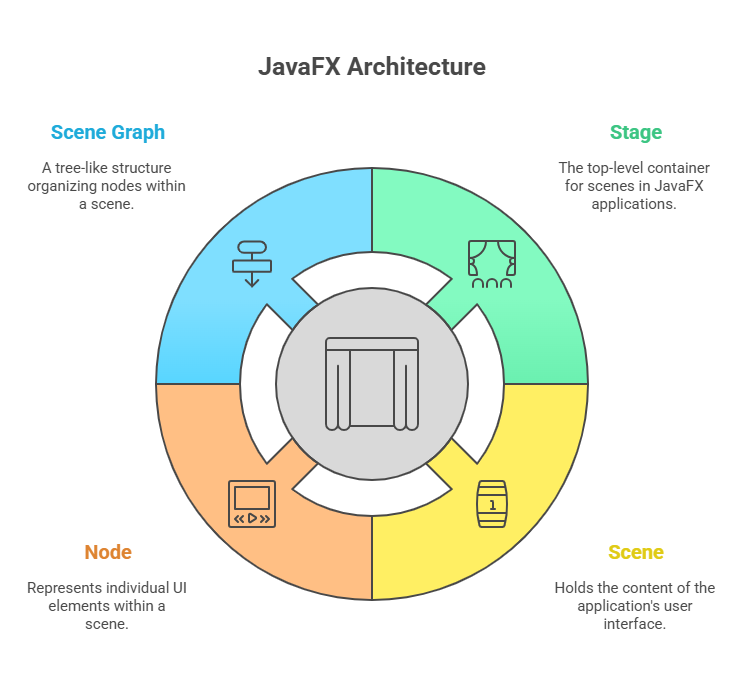
- Stage: The “stage,” a top-level container for scenes, is JavaFX’s main metaphor. All JavaFX applications get one primary stage from the runtime system. One stage is usually enough for most purposes, but you can add more.
- Scene: A “scene” defines what goes onstage. It contains your application’s user interface’s controls, text, and visuals. Create a JavaFX application by adding at least one
Sceneobject to aStage. - Nodes: Scene elements including buttons, labels, forms, and images are “nodes”.
Nodeis the root class for these items. - Scene Graph: A
Scenevisual material is organised into a tree-like “scene graph” of nodes. Use this scene graph to dynamically generate and adjust your app’s UI. Similar to AWT and Swing, JavaFX layout panes (FlowPane,GridPane,BorderPane) position nodes in a scene.
Basic JavaFX Application Structure and Life Cycle
A JavaFX application must extend the Application class, which is found in the javafx.application package. The Application class defines three essential life-cycle methods that your application can override:
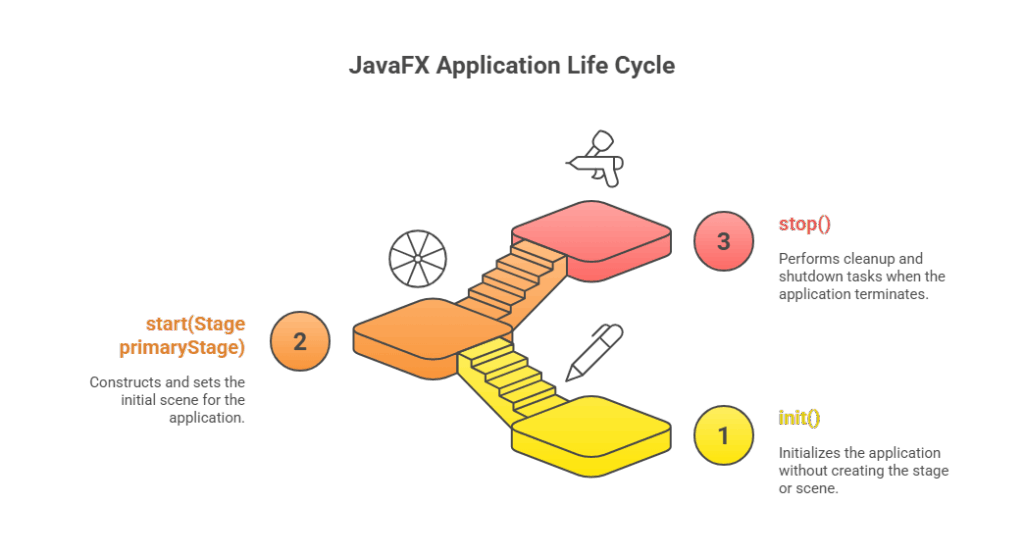
- init():
init()was called first when the app started. It provides initialisations but cannot build the stage or scenario. We give an empty default version if no specific initialisations are needed. - start(Stage primaryStage): Your program starts after
init(). Runtime system providesprimaryStageobject reference. Here, you build and set your app’s initial scenario. Your app must override this abstract method. - stop(): When your program terminates, invoke this method to cleanup or shutdown.
JavaFX applications are launched by calling the static launch() function of the Application class, usually from main(). Construction of stages or scenes must occur on the application thread, where start() is called.
Here’s a basic JavaFX application skeleton illustrating these concepts:
import javafx.application.Application;
import javafx.scene.Scene;
import javafx.stage.Stage;
import javafx.scene.layout.FlowPane; // A simple layout pane
import javafx.application.Platform; // For Platform.exit()

public class JavaFXSkel extends Application {

    public static void main(String[] args) {
        System.out.println("Launching JavaFX application.");
        // Start the JavaFX application by calling launch().
        launch(args);
    }

    // Override the init() method.
    @Override
    public void init() {
        System.out.println("Inside the init() method.");
    }

    // Override the start() method. This is where the GUI is built.
    @Override
    public void start(Stage myStage) {
        System.out.println("Inside the start() method.");

        // Give the stage a title.
        myStage.setTitle("JavaFX Skeleton.");

        // Create a root node. FlowPane uses a flow layout.
        FlowPane rootNode = new FlowPane();

        // Create a scene with the root node, width, and height.
        Scene myScene = new Scene(rootNode, 300, 200);

        // Set the scene on the stage.
        myStage.setScene(myScene);

        // Show the stage and its scene.
        myStage.show();
    }

    // Override the stop() method.
    @Override
    public void stop() {
        System.out.println("Inside the stop() method.");
    }
}
Output for JavaFXSkel:
When the program runs:
Launching JavaFX application.
Inside the init() method.
Inside the start() method.
An empty window titled “JavaFX Skeleton.” will appear. When you close this window, the console will show:
Inside the stop() method.Common Controls and Event Handling in JavaFX
JavaFX supplies many controls in the javafx.scene.control package. Common ones and event handling:
- Label (javafx.scene.control.Label): The simplest control for displaying text or images.
- Button (javafx.scene.control.Button): The push button generates an
ActionEvent. - TextField (javafx.scene.control.TextField): A single-line text entry field for entered and edited text.
- CheckBox (javafx.scene.control.CheckBox): A checked, unchecked, or an indeterminate control.
- ListView (javafx.scene.control.ListView): Users can choose items from a list. Content that exceeds its dimensions automatically includes scrollbars.
Event handling in JavaFX follows Swing’s delegation event architecture, but is frequently simpler. A button generates an event, which is transmitted to one or more registered listeners. Buttons generate ActionEvent. Use lambda expressions or anonymous inner classes to register an event handler with setOnAction().
Here’s an example demonstrating a Label and two Button controls with event handling:
import javafx.application.Application;
import javafx.scene.Scene;
import javafx.stage.Stage;
import javafx.scene.layout.FlowPane;
import javafx.scene.control.Button;
import javafx.scene.control.Label;
import javafx.event.ActionEvent; // For ActionEvent
import javafx.event.EventHandler; // For EventHandler interface
import javafx.geometry.Pos; // For alignment

public class JavaFXEventDemo extends Application {

    Label responseLabel; // Label to display button presses

    public static void main(String[] args) {
        launch(args);
    }

    @Override
    public void start(Stage myStage) {
        myStage.setTitle("JavaFX Buttons and Events");

        // Use a FlowPane with horizontal and vertical gaps of 10.
        FlowPane rootNode = new FlowPane(10, 10);
        // Center the controls in the scene.
        rootNode.setAlignment(Pos.CENTER);

        Scene myScene = new Scene(rootNode, 300, 100);
        myStage.setScene(myScene);

        // Create a label.
        responseLabel = new Label("Push a Button");

        // Create two push buttons.
        Button btnUp = new Button("Up");
        Button btnDown = new Button("Down");
        Button btnExit = new Button("Exit");

        // Handle action events for the Up button using a lambda expression.
        btnUp.setOnAction((ActionEvent ae) -> {
            responseLabel.setText("You pressed Up.");
        });

        // Handle action events for the Down button using a lambda expression.
        btnDown.setOnAction((ae) -> responseLabel.setText("You pressed Down."));

        // Handle action events for the Exit button.
        // Platform.exit() is used to terminate the application programmatically
        btnExit.setOnAction((ae) -> Platform.exit());

        // Add the label and buttons to the scene graph.
        rootNode.getChildren().addAll(btnUp, btnDown, btnExit, responseLabel);

        myStage.show();
    }
}
Output for JavaFXEventDemo:
A window titled “JavaFX Buttons and Events” will appear with three buttons (“Up”, “Down”, “Exit”) and a label saying “Push a Button”.
- If you click “Up”, the label changes to “You pressed Up.”
- If you click “Down”, the label changes to “You pressed Down.”
- If you click “Exit”, the application window closes and the program terminates.
A straightforward stage-scene-node model, rich controls, and an efficient event-handling system simplify GUI creation in JavaFX. As with a well-organised theatre play, the stage is your application window, the scene is what’s being performed, the nodes are the actors and props, and the scene graph is the script and choreography.