Rust is a general-purpose programming language that may be used to create a wide variety of applications. These applications include embedded systems, online services, desktop programs, and system programming of all kinds. Installation of Rust is required before you can begin developing your first application in Rust.
Use of rustup, which is both the Rust installer and the toolchain manager, is the method that is recommended and the one that is the least complicated for installing Rust. Rustup is responsible for managing the installation process for particular platforms. Due to the fact that it is a tool for maintaining Rust installations and enables quick upgrades to new versions, it is preferred over other ways of installation. Through the use of rustup, the Rust toolchain may be installed locally in certain folders.
Rustup installs the most recent stable build, also known as a channel, by default. Rust generally calculates a release cycle of six weeks. The following are the three channels that are available: Stable, which is the most recent release; Beta, which is the next version; and Nightly, which offers experimental features. Although it is possible to install certain versions of the Rust environment or other channels by utilising the commands “rustup install” or “rustup install beta” or “rustup install nightly,” it is typically suggested that you work with the stable channel.
Rust programming installation procedure
Here are the steps for installing Rust using rustup on Windows OS:

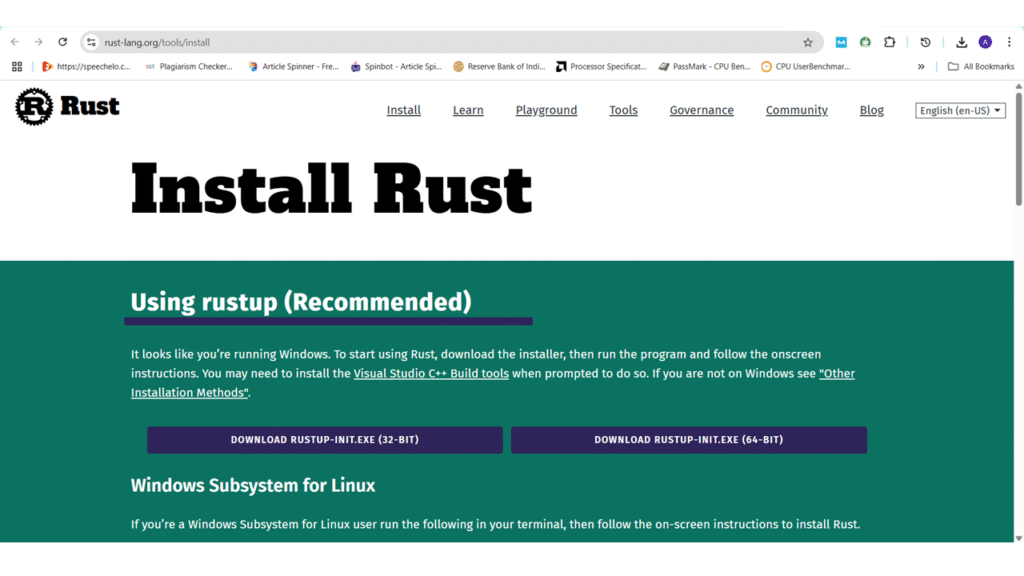
Step1: Go to the rustup.rs website or the Install Rust web page and follow the instructions for installing Rust. Choose the according to your Operating System Architecture.
Step2: Go to Downloads, right click on rustup-init.exe, then click on Run as Administrator.

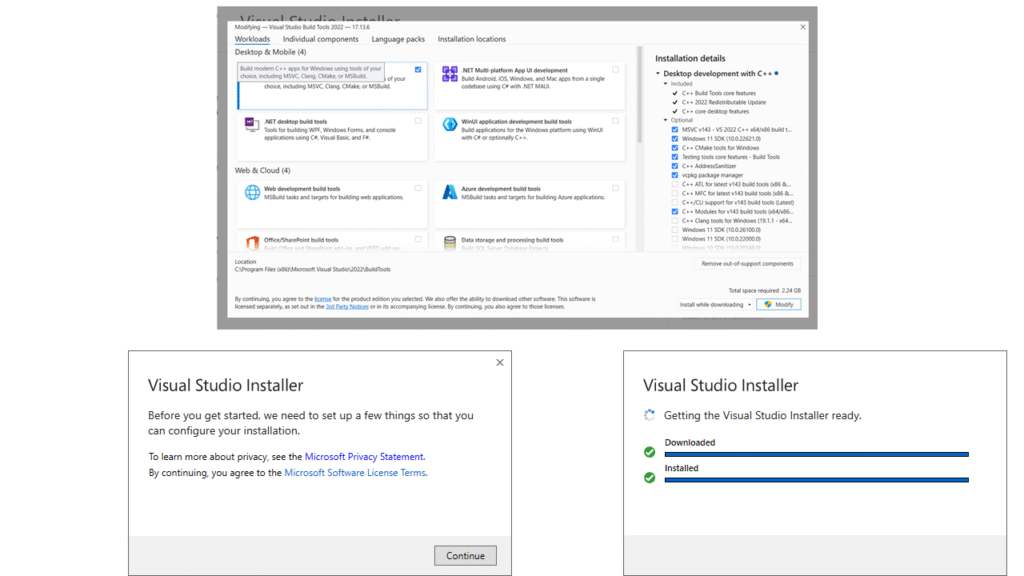
Step3: Rust requires the Microsoft C++ Build Tools from a recent version of Microsoft Visual Studio. If Visual Studio is installed, you may already have them. The easiest way to get these is by installing “Build Tools for Visual Studio 2017,” “Build Tools for Visual Studio 2019,” or “Visual Studio 2022,” making sure to select the “C++ Build Tools” workload. You can confirm availability with the Microsoft Visual C++ Redistributable. Instructions for installing the Visual C++ Build Tools are available at C++ build tool. download and Install it.

Step 4: Open the VS Build tool and go to the “Workload” tab to select the “Desktop Development with C++” workload.
Then select the components
- MSVC v143 – VS 2022 C++ x64/x86 build tools (Latest)
- Windows 11 SDK (10.0.22621.0)
For installation and then Select english from the language tab then click on the Install tab
Step5: Change this behaviour with the following command in the Windows Command Prompt
If your OS is 32 bit architecture, the following command is used:
rustup set default-host i686-pc-windows-msvcrustup set default-host x86_64-pc-windows-msvcIf your OS 64 Bit architecture, the following command is used:
rustup set default-host aarch64-pc-windows-msvcswitch toolchains to support all windows targets, run below command on the Windows command prompt
rustup target add x86_64-pc-windows-msvcOR

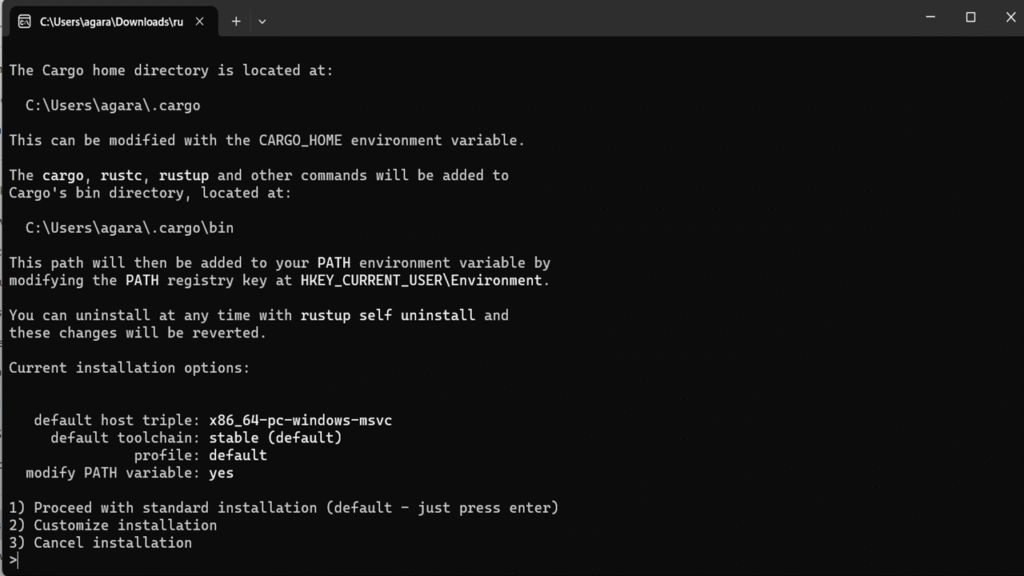
Go to Downloads and double-click on the rustup-init.exe new window will open in the command prompt, like shown in the picture.
press enter on the keyboard. the process shown on window after processing, press to continue shown after you press the Enter key the window will close automatically.
Step 6: Verify the installation:
Open a shell or command prompt and enter the following command: rustc –version You should see output showing the version number, commit hash, and commit date for the latest stable version. If you see this information, Rust is successfully installed. If not, please review your PATH settings and proceed with troubleshooting. You can also check the Cargo version using cargo –version.
Step 7: Updating Rust:
To update Rust and rustup to the latest version, run rustup update.
Step 8: Uninstalling Rust: To uninstall Rust and rustup, run rustup self uninstall.
Setting up your Environment
- Command Line: Rust doesn’t have specific demands about where your code lives, allowing you to use a command-line environment like a Unix or Linux shell, Mac OS Terminal, or Windows Command Prompt. Commands shown in the start: “>” for PowerShell-specific examples. Lines without these symbols usually show the output. After installation, you can use the rustc command to compile individual Rust files or the cargo command for project management, building, running, and testing.
- Editors and IDEs: Rust makes no specific demands about your editing tools. Just about any text editor will work. However, many text editors and integrated development environments (IDEs) have built-in support for Rust.
- The Rust team has been concentrating on enabling great IDE support via rust-analyzer. rust-analyzer provides features like auto-completion functionality. It works with editors that support the Language Server API, including VS Code, Emacs, Vim/Neovim, and others. For Visual Studio Code, using rust-analyzer is as simple as installing the extension.
- install the rust-src component using rustup for rust-analyzer integration with some editors.
- Other tools like rustfmt for code formatting and Clippy for improving code quality are also available and can be installed via rustup component add rustfmt and rustup component add clippy. You can integrate these tools into your development workflow and even CI/CD pipelines.
- There is also a different IDE available called RustRover. A fairly current list of editors and IDEs is available on the tools page of the Rust website.
Once Rust is installed and environment is set up, you can begin creating and running Rust programs, such as “Hello, World!” application. start by creating a project directory and using Cargo to manage the project.
